
Integration with Firebase

As an example, let's create a page with comments, which will use Firebase to store data and authorization.

1. Setting up a Firebase project#

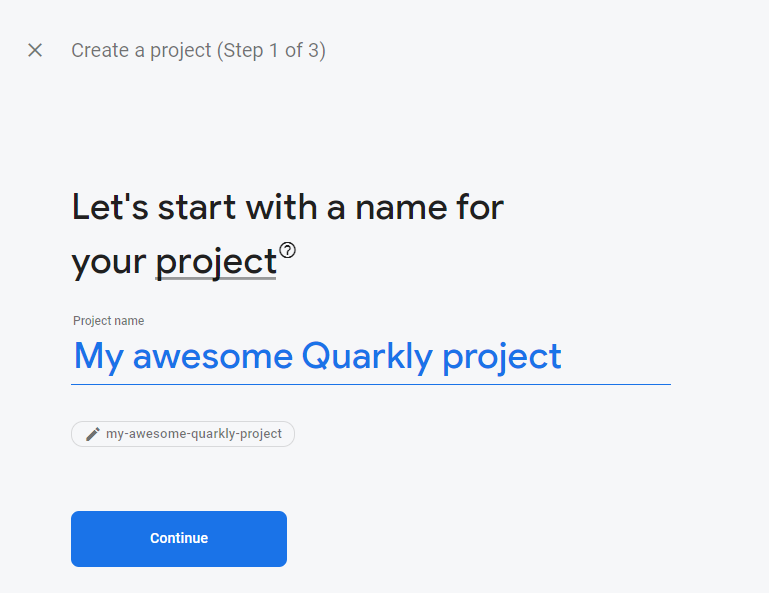
1.1 Creating a project in Firebase#

Firebase index

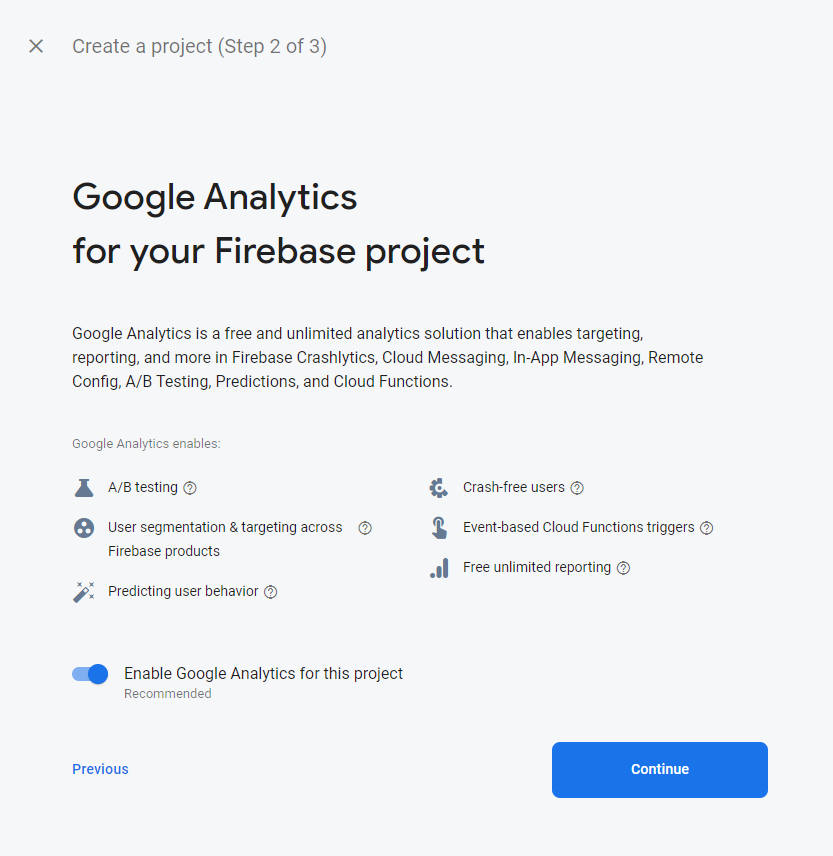
Go to console.firebase.google.com and click Create a Project. Specify the name. If necessary, connect Google Analytics.

Create a project. Step 1

Create a project. Step 2

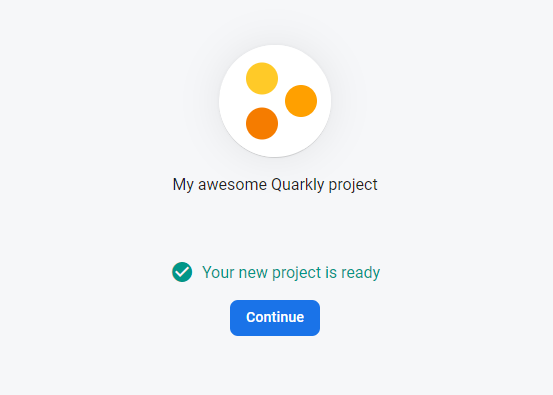
In a little while, the project will be ready

Project is ready

1.2 Creating (Registering) a Firebase Web Application#

On the main page of the project, click the Web button and specify the name of the web application. After that, please click Register app and Continue to console buttons

Project main page

Register app

1.3 Creating and Configuring Firebase Authentication#

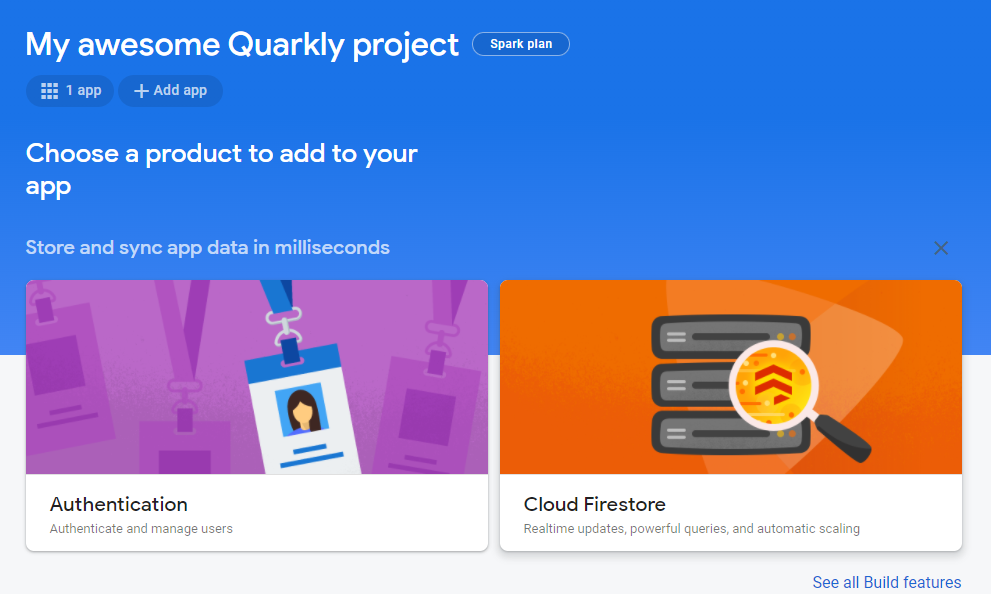
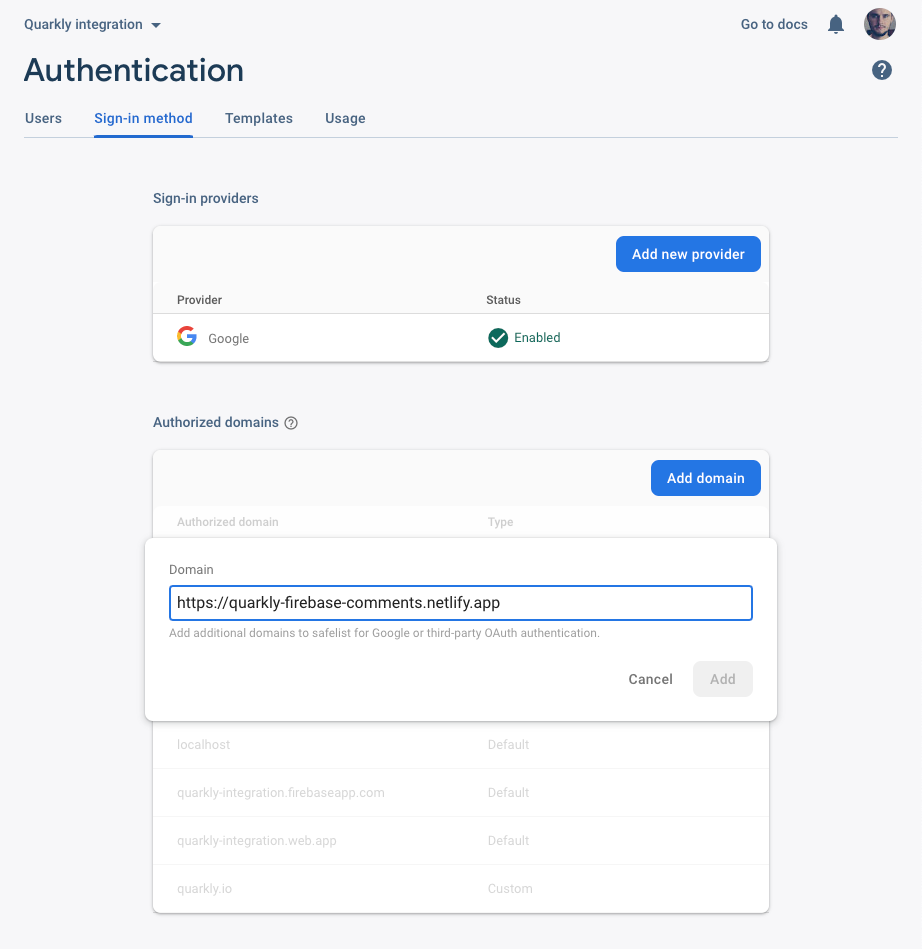
On the main page of our project, select Authentication and then Get started.

Firebase Auth

Auth getting started

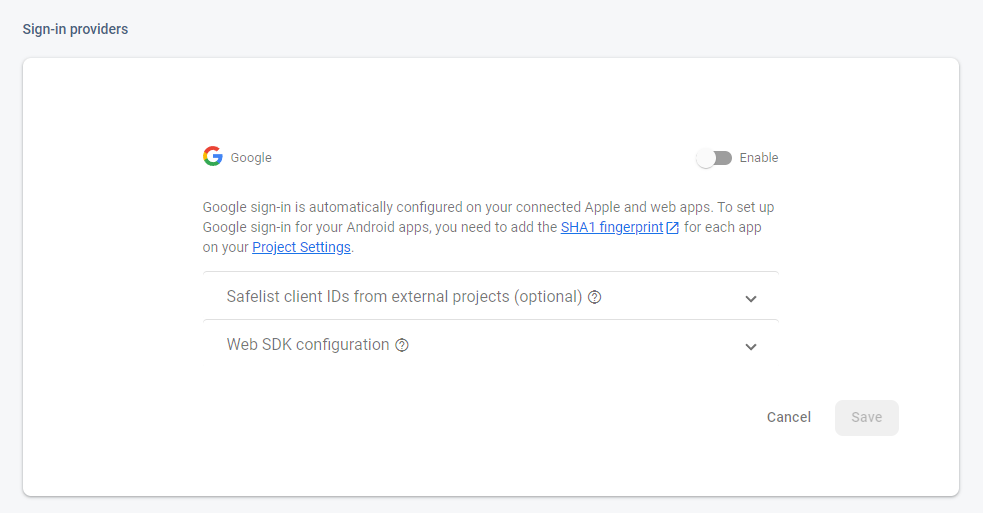
In Sign-in providers, select authorization through Google and turn it on.

Auth providers

Google sign-in

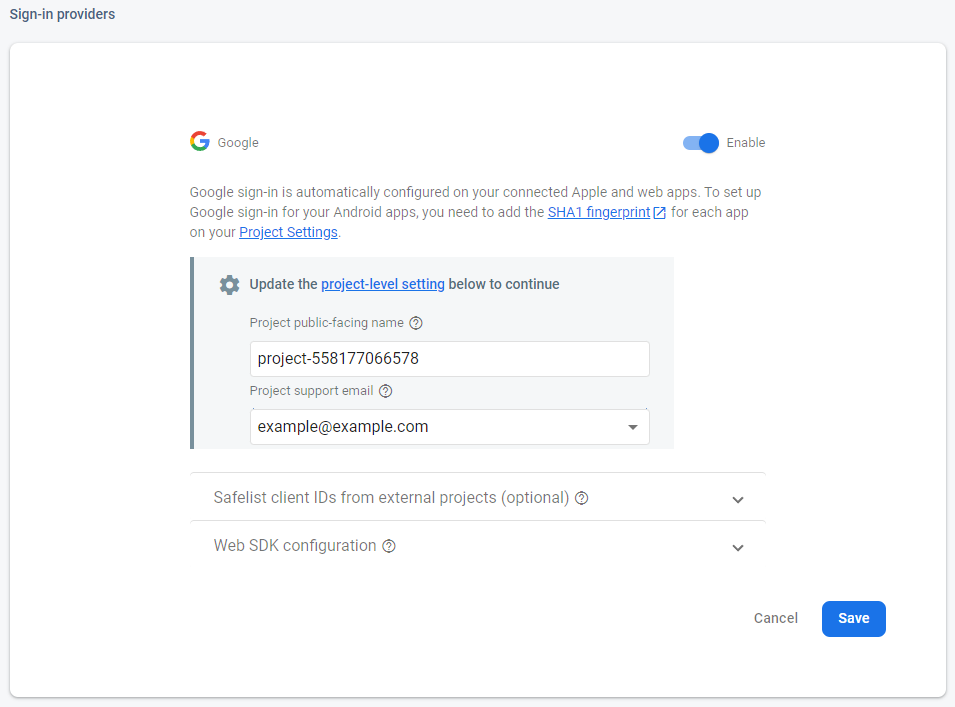
Click the Enable switch, specify Project support email and save.

Google sign-in project level

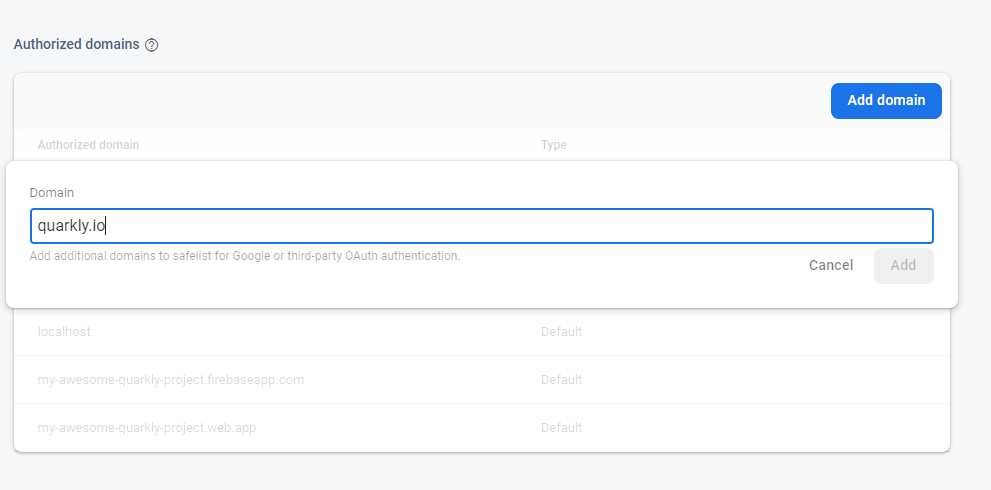
For authorization to work in preview mode, you need to add quarkly.io domain to the Authorized domains list below Sign-in providers. You will also need to specify the domain of an already published site.

Authorized domains

1.4 Creating and Configuring the Firestore Base#

1.4.1 Creating a base#

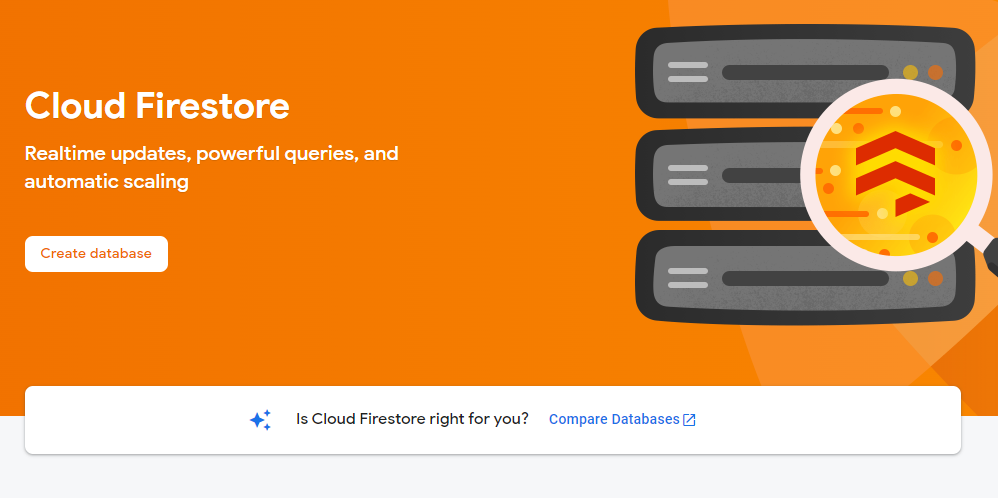
Go to the Firebase project home page and select Cloud Firestore, then click Create database.

Firestore

In the Secure rules for Cloud Firestore step, leave everything as it is.

Create database. Step 1

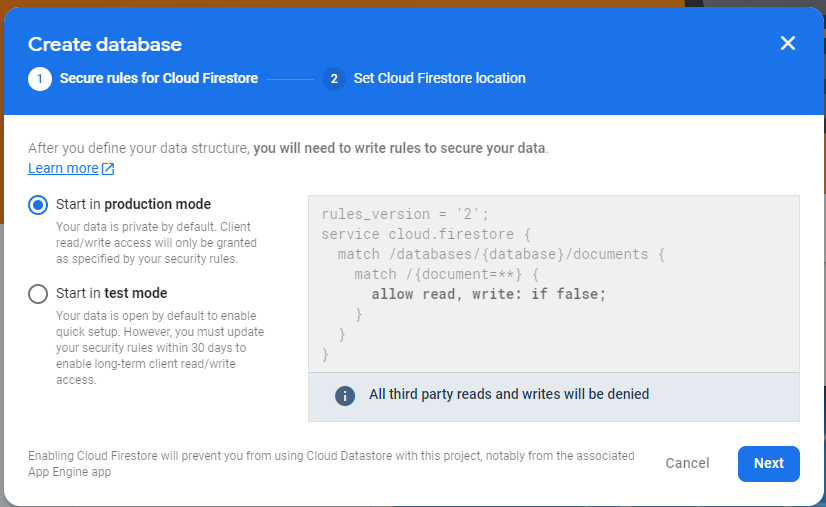
In the Set Cloud Firestore location step, select the region we want. In this case I chose eur3 (europe-west).

Create database. Step 2

1.4.2 Setting up the base#

Database rules

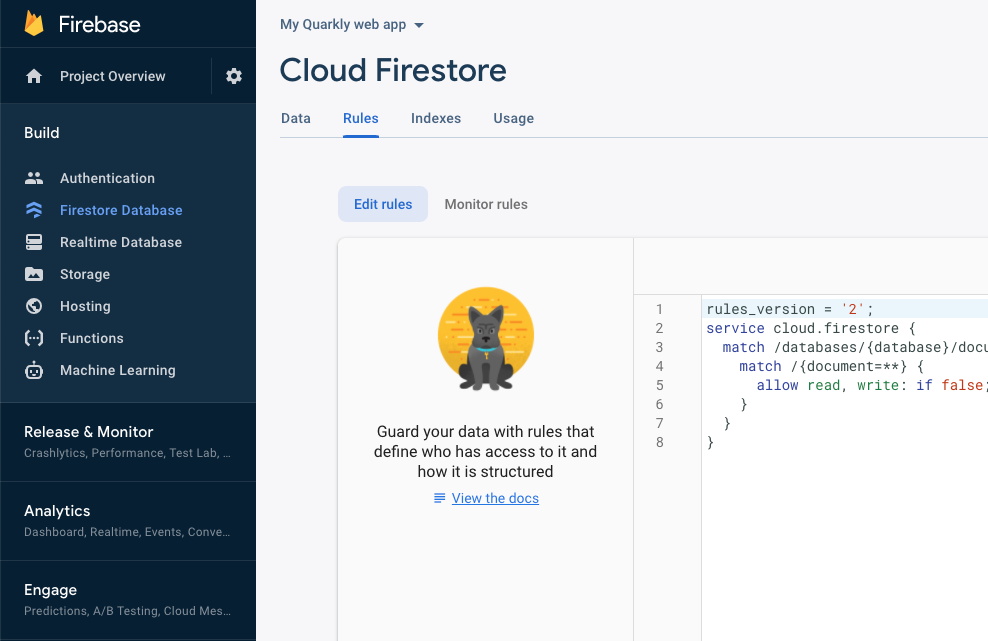
On the page with the database, go to the Rules section and specify these rules. After that, click Publish.

rules_version = '2';
service cloud.firestore {
match /databases/{database}/documents {
match /comments/{document=**} {
allow read;
allow create: if request.auth != null && request.auth.uid == request.resource.data.author;
}
match /users/{$uid} {
allow read;
allow write: if request.auth != null && request.auth.uid == $uid;
}
match /{document=**} {
allow read, write: if false;
}
}
}

2. Creating a Project in Quarkly#

Create a new blank project

2.1 Component (module) FirebaseConfig#

Create the FirebaseConfig component in Quarkly. This will be a module with the parameters of our Firebase project.

Copy the code below and paste it into our component.

// Import the functions you need from the SDKs you need
import { initializeApp } from 'firebase/app';
// TODO: Add SDKs for Firebase products that you want to use
// https://firebase.google.com/docs/web/setup#available-libraries
// Your web app's Firebase configuration
// For Firebase JS SDK v7.20.0 and later, measurementId is optional
const firebaseConfig = {};
let app = null;
// Export the getFirebase function, which will return an instance of Firebase
export function getFirebase() {
// Firebase does not work with server-side,
// so we check that we are on the client-side (in the browser).
if (typeof window !== 'undefined') {
// If Firebase has already been initialized, then return the existing instance.
if (app) return app;
app = initializeApp(firebaseConfig);
return app;
}
return null;
}
note

โš ๏ธ FirebaseConfig does not need to be added to the page.

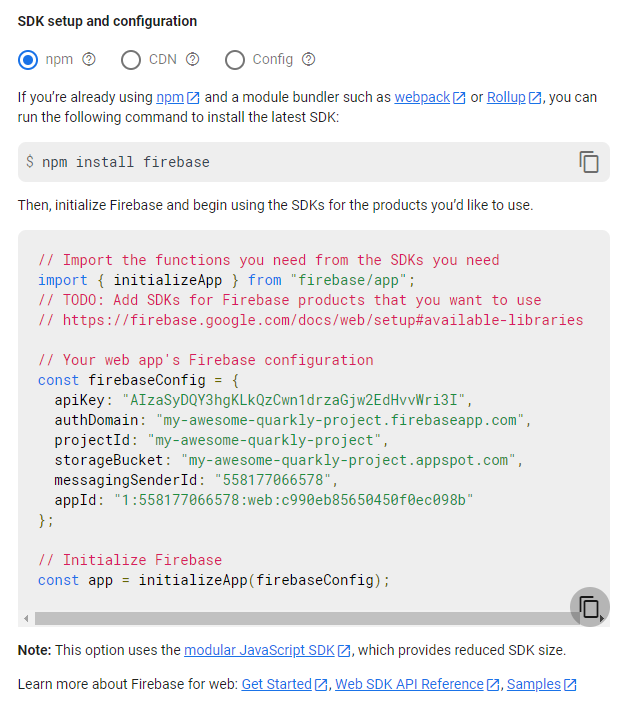
Go to the Firebase project home page, click 1 app under the name, and then go to our Web app settings.

Web App settings

Web App settings opened

At the end of the page, you will find the SDK setup and configuration. Copy firebaseConfig and paste it instead of the string

const firebaseConfig = {};

SDK setup and config

2.2 Component (module) FirebaseHooks#

Create the FirebaseHooks component in Quarkly. This will be a module with the parameters of our Firebase project.

Copy the code below and paste it into our component.

import { useState, useEffect } from 'react';
import {
getFirestore,
collection,
query,
orderBy,
onSnapshot,
doc,
} from 'firebase/firestore';
import { getAuth, onAuthStateChanged } from 'firebase/auth';
import { getFirebase } from './FirebaseConfig';
// the useFirebase hook is a wrapper over useEffect.
// The function passed to useFirebase will be run after
// firebase is initialized.
export const useFirebase = (cb, deps = []) => {
const firebase = getFirebase();
useEffect(() => {
if (!firebase) return;
return cb(firebase);
}, [firebase, ...deps]);
};
// The useLoadingValue hook is an auxiliary hook to control the state of values.
// In addition to value, loading, error returns auxiliary
// functions success and failure to set value/error.
const useLoadingValue = () => {
const [value, setValue] = useState(undefined);
const [loading, setLoading] = useState(true);
const [error, setError] = useState(undefined);
const success = (res) => {
setLoading(false);
setValue(res);
};
const failure = (res) => {
setLoading(false);
setError(res);
};
return {
value,
loading,
error,
success,
failure,
};
};
// the useComments hook is used to subscribe to user comments.
// Returns [value, loading, error]
// value is an array of comments.
export const useComments = () => {
const { success, failure, ...state } = useLoadingValue();
useFirebase((firebase) => {
// Get an instance of Firestore.
const db = getFirestore(firebase);
// Firebase request:
// Get comments, in descending timestamp order
// (new comments will be at the top of the list).
const commentsQuery = query(
collection(db, 'comments'),
orderBy('timestamp', 'desc')
);
// Subscribe to changes of query results with the onSnapshot function
// onSnapshot returns a function to unsnap
const unsubscribe = onSnapshot(
commentsQuery,
(snap) => {
// Save the query result in newValue.
const newValue = snap.docs.map((document) => {
return {
id: document.id,
...document.data(),
};
});
// Call success to update the state.
success(newValue);
},
failure
);
return () => unsubscribe();
});
const { value, loading, error } = state;
return [value, loading, error];
};
// The useAuthor hook is used to subscribe to a comment author by its id.
export const useAuthor = (id) => {
const { success, failure, ...state } = useLoadingValue();
useFirebase(
(firebase) => {
// Get an instance of Firestore
const db = getFirestore(firebase);
// Firebase query:
// Get the author's document by id
const authorQuery = doc(db, 'users', id);
// Subscribe to changes of query results with the onSnapshot function
// onSnapshot returns a function to unsubscribe.
const unsubscribe = onSnapshot(
authorQuery,
(snap) => {
const newValue = {
id: snap.id,
...snap.data(),
};
success(newValue);
},
failure
);
// unsubscribe (reset the effect)
return () => unsubscribe();
},
[id]
);
const { value, loading, error } = state;
return [value, loading, error];
};
// the useUser hook is used to sign up for user authorization
export const useUser = () => {
const { success, ...state } = useLoadingValue();
useFirebase((firebase) => {
// Get an instance of FirebaseAuth
const auth = getAuth(firebase);
// Sign up for user authorization changes
const unsubscribe = onAuthStateChanged(auth, success);
// unsubscribe (reset the effect)
return () => unsubscribe();
});
const { value, loading } = state;
return [value, loading];
};
// the useAuth hook is used to get an instance of FirebaseAuth
export const useAuth = () => {
const [auth, setAuth] = useState();
useFirebase((firebase) => {
setAuth(getAuth(firebase));
});
return auth;
};
// the useFirestore hook is used to get an instance of Firestore
export const useFirestore = () => {
const [db, setDb] = useState();
useFirebase((firebase) => {
setDb(getFirestore(firebase));
});
return db;
};
export default {}
note

โš ๏ธ FirebaseHooks does not need to be added to the page.

2.3 Comment Component#

Create the Comment component.

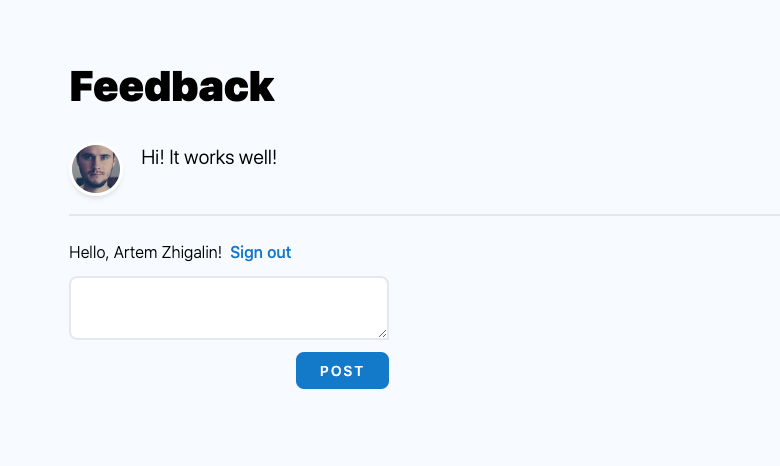
The Comment component is responsible for displaying a single comment. The comment contains the author's name, his picture and the text of the comment itself.

Copy the code below and paste it into our component

import React from 'react';
import { useOverrides } from '@quarkly/components';
import { Box, Text, Image } from '@quarkly/widgets';
import { useAuthor } from './FirebaseHooks';
// Object with overrides
// Read more about overrides: https://developers.quarkly.io/components/overrides/overview
const overrides = {
Container: {
kind: 'Box',
},
'Author Name': {
kind: 'Text',
},
'Author Image': {
kind: 'Image',
},
'Comment Text': {
kind: 'Text',
},
};
// Comment component:
// Displays the user's comment. The comment data is passed through the 'data' property
const Comment = ({ data, ...props }) => {
const { override, rest } = useOverrides(props, overrides);
// We subscribe to the data about the author through the useAuthor hook.
// author contains displayName and photoUrl properties.
const [author, loading, error] = useAuthor(data.author);
return (
<Box {...rest}>
{loading && <>Loading...</>}
{error && <>Error occurred: {error.toString()}</>}
{author && (
<Box {...override('Container')}>
<Text
{...override('Author Name')}
children={author?.displayName ?? 'Anonymous'}
/>
<Image
{...override('Author Image')}
src={
author?.photoUrl ??
'https://pixabay.com/get/g1ce8979867c68ee9d2be1c34cfece91734cb62776ecc08a61e044a58f8bdff129180b58526dd088d3bc90789392da9af60585ddb7138877cec7cc64a9de6bcb28b9f9394ff968df48a5ef3f1ddcbb31d_640.png'
}
/>
<Text {...override('Comment Text')} children={data.text} />
</Box>
)}
</Box>
);
};
Object.assign(Comment, {
title: 'Comment',
overrides,
});
export default Comment

2.4 Comments Component#

Create the Comments component.

The Comments component is responsible for displaying the list of comments (the list of Comment components).

Copy the code below and paste it into our component.

import React from 'react';
import { useOverrides } from '@quarkly/components';
import { Box, Text } from '@quarkly/widgets';
import { useComments } from './FirebaseHooks';
import Comment from './Comment';
// Object with overrides
// Read more about overrides: https://developers.quarkly.io/components/overrides/overview
const overrides = {
'Comments Title': {
kind: 'Text',
props: {
children: 'Comments:',
font: '--headline2',
},
},
Comment: {
kind: Comment,
},
};
// Comments component:
// Displays comments.
const Comments = (props) => {
const { override, rest } = useOverrides(props, overrides);
// We subscribe to comments with the useComments hook.
// Comments contains an array of comments.
const [comments, loading, error] = useComments();
return (
<Box {...rest}>
<Text {...override('Comments Title')} />
{loading && <>Loading...</>}
{error && <>Error occurred: {error.toString()}</>}
{comments &&
comments.map((comment) => (
<Comment
key={comment.id}
{...override('Comment', `Comment ${comment.id}`)}
data={comment}
/>
))}
</Box>
);
};
Object.assign(Comments, {
title: 'Comments',
overrides,
});
export default Comments;

2.5 CommentForm component#

Create the CommentForm component.

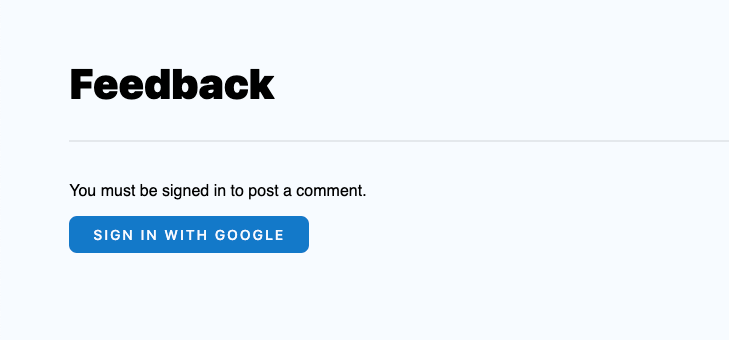
The CommentForm component is responsible for displaying the comment form, as well as the authorization button via Google account.

Copy the code below and paste it into our component.

import React, { useState } from 'react';
import { useOverrides } from '@quarkly/components';
import { Box, Text, Button, Input } from '@quarkly/widgets';
import {
collection,
addDoc,
serverTimestamp,
setDoc,
doc,
} from 'firebase/firestore';
import { GoogleAuthProvider, signInWithPopup, signOut } from 'firebase/auth';
import { useUser, useAuth, useFirestore } from './FirebaseHooks';
const overrides = {
'Google SignIn Button': {
kind: 'Button',
props: {
children: 'Sign in with Google',
},
},
'Sign out Button': {
kind: 'Button',
props: {
children: 'Sign out',
},
},
'Post Button': {
kind: 'Button',
props: {
children: 'Post',
},
},
'Comment Input': {
kind: 'Input',
},
};
// Initialize the Google auth provider
const googleProvider = new GoogleAuthProvider();
// When setting prompt: 'select_account' authorization server prompts the user
// to select a user account. This allows a user who has multiple accounts at
// the authorization server to select amongst the multiple accounts that
// they may have current sessions for.
googleProvider.setCustomParameters({ prompt: 'select_account' });
// CommentForm component:
// Displays a form to post a comment, as well as an authorization button via Google account.
const CommentForm = ({ ...props }) => {
const { override, rest } = useOverrides(props, overrides);
// Subscribes to the data of an authorized user
const [user, loading] = useUser();
// Get an instance of FirebaseAuth
const auth = useAuth();
// Get an instance of Firestore
const db = useFirestore();
// Declare text to store input state
const [text, setText] = useState('');
// Function to handle comment input
const onCommentChange = (e) => {
setText(e.target.value);
};
// Function for processing the comment publication button
const onPostClick = () => {
if (text === '' || !db) return;
// Add a comment
addDoc(collection(db, 'comments'), {
text,
author: user.uid,
timestamp: serverTimestamp(),
});
setText('');
};
// Function for handling a press of the authorization button
const onSignInClick = async () => {
if (!auth || !db) return;
// Authorization via Google
const { user } = await signInWithPopup(auth, googleProvider);
// Add data about the user, so that afterwards
// they can be used to display a comment
await setDoc(doc(db, 'users', user.uid), {
displayName: user.displayName,
photoUrl: user.photoURL,
});
};
// Function for handling a press of the sign out button
const onSignOutClick = () => {
if (!auth) return;
signOut(auth);
};
return (
<Box {...rest}>
{loading ? (
<>Loading...</>
) : user ? (
<>
<Text
{...override('Text')}
children={`Hello, ${user.displayName}!`}
/>
<Button
{...override('Sign out Button')}
onClick={onSignOutClick}
/>
<Input
{...override('Comment Input')}
value={text}
onChange={onCommentChange}
/>
<Button
{...override('Post Button')}
onClick={onPostClick}
/>
</>
) : (
<>
<Text>You must be signed in to post a comment.</Text>
<Button
{...override('Google SignIn Button')}
onClick={onSignInClick}
/>
</>
)}
</Box>
);
};
Object.assign(CommentForm, {
title: 'CommentForm',
overrides,
});
export default CommentForm

2.4 Component Styling#

Add Comments and CommentForm to the page and then style them.

After styling, the Page code will look something like this

<Section background="--color-light" padding="100px 0 100px 0">
<Components.Comments margin="0px 0px 24px 0px" border-width="0 0 2px 0" border-style="solid" border-color="--color-lightD2">
<Override slot="Comments Title" margin="16px 0px 32px 0px">
Feedback
</Override>
<Override slot="Comment">
<Override slot="Comment Text" font="--lead" margin="0px 0px 16px 0px" />
<Override
slot="Author Image"
max-width="54px"
max-height="54px"
border-radius="27px"
margin="0px 18px 18px 0px"
border-width="3px"
border-style="solid"
border-color="white"
box-shadow="--m"
/>
<Override slot="Author Name" font="--base" display="none" />
<Override slot="Container" display="flex" />
</Override>
</Components.Comments>
<Components.CommentForm max-width="320px">
<Override
slot="Comment Input"
as="textarea"
display="flex"
border-radius="8px 8px 0px 8px"
margin="12px 0px 12px 0px"
min-width="320px"
/>
<Override
slot="Post Button"
margin="0px 0px 0px auto"
display="flex"
text-align="left"
flex-direction="row"
border-radius="8px"
text-transform="uppercase"
letter-spacing="2px"
font="normal 500 14px/1.5 -apple-system, system-ui, 'Segoe UI', 'Roboto', 'Oxygen', 'Ubuntu', 'Cantarell', 'Fira Sans', 'Droid Sans', 'Helvetica Neue', sans-serif"
/>
<Override slot="Text" font="--base" display="inline" />
<Override
slot="Sign out Button"
background="transparent"
color="--primary"
padding="0px 0px 0px 0px"
margin="0px 8px 0px 8px"
font="normal 500 16px/1.5 -apple-system, system-ui, 'Segoe UI', 'Roboto', 'Oxygen', 'Ubuntu', 'Cantarell', 'Fira Sans', 'Droid Sans', 'Helvetica Neue', sans-serif"
/>
<Override
slot="Google SignIn Button"
margin="0px auto 0px 0px"
display="flex"
flex-direction="row"
border-radius="8px"
text-transform="uppercase"
letter-spacing="2px"
font="normal 500 14px/1.5 -apple-system, system-ui, 'Segoe UI', 'Roboto', 'Oxygen', 'Ubuntu', 'Cantarell', 'Fira Sans', 'Droid Sans', 'Helvetica Neue', sans-serif"
/>
</Components.CommentForm>
</Section>

3. Project Publication#

Quarkly publication settings

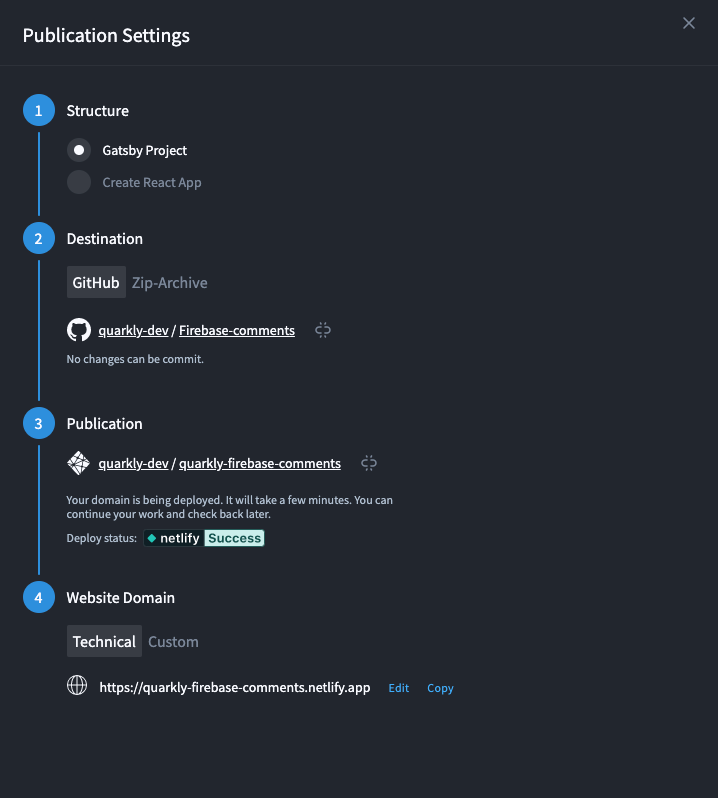
After the project is published on Netlify, our site will have a Technical domain name.

Copy it and add it to the list of Authorized Domains in the Firebase project.

To do this, go to Authentication >Sign-in method and under Authorized domains add our technical domain.

Auth add new domain

After the publication of the project page, our site will look something like this

Published ver

Published ver signed up

note